The fluid scanning technology from Scan Science works with the scanner manufacturer’s film strip holders. Nikon makes a glass carrier for the Coolscan 9000 that holds film flatter than the standard holder, but wet scanning also helps address this challenge. In the case of Scan Science, this glass carrier is not recommended.
The Scan Science kit includes a lengthy document explaining wet scanning, technique and workflow for exceptional scans. One missing element, likely due to liability, is how to modify the Nikon film holders that come with the Nikon Coolscan 9000. That said, if the information I share here adversely affects your film holders, scanner or you in any way – physically, mentally, monetarily etc., you are on your own. I won’t be held responsible for any damages as your actions are yours.
It is also possible that modifying the Nikon film holders was seen as an obvious task, one that required no further education. Either way, this was my first experience with Scan Science and wet scanning and did not want to break my film holder to find out later that it wasn’t for me. The goal was to modify the Nikon film holder to work with the Scan Science system without breaking it.
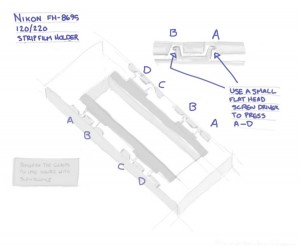
The diagram below is a sketch I made to illustrate the method and order for removing the film holder covers from the Nikon FH-8695 120/220 Strip Film Holder. Clicking it will show you a large version for easy reading. I expect all the other holders can be modified using the same approach.
First, work in a well lit area. These tabs are small and trying to not break plastic can be stressful enough. Don’t strain your eyes working in the dark.
Second, find an eye-glasses or hobby flat-head screw driver. I used the eye-glasses variety, but anything similar should work.
The film holder covers are held to the holder through pairs of plastic tabs. These tabs are circular and fit into the holder allowing the covers to pivot open and closed. Refer to the exploded view of tabs A and B to help visualize the following steps.
Begin by gently pressing the first cover to the left (adding stress on B and D).
Using the small flathead screw driver press firmly and gently on the outer edge of A. Pull the cover away from the holder so that tab A stays out.
Then move on to B. If tab A is sufficiently out you can apply pressure to the right to help ease tab B out. When I did my first pair, this was not the case. Pulling the cover toward me and away from the holder seemed to do the trick.
Once A and B are out, do the same on C. Once C comes loose, D should pop out or be trivial to remove.
Once you know how much force it takes to move the tabs without breaking them, the process is relatively easy. The biggest challenge is having the confidence that removing the covers can be done without harming them or the holder. Hopefully this helps others intimidated by the task.

[…] If you are using a Nikon Coolscan 9000 you will have to modify your film holder. ScanScience does not offer instructions on how to do it, so it is DIY activity. You can see how I did it in a previous post. […]